This document provides an overview of the NTLM authentication process and provides details on installing & configuring the system. Although initially targetted towards NTLM, the architecture is such that it will likely work with no change for any other HTTP authentication mechanism supported by IIS/Apache and Internet Explorer/Netscape.
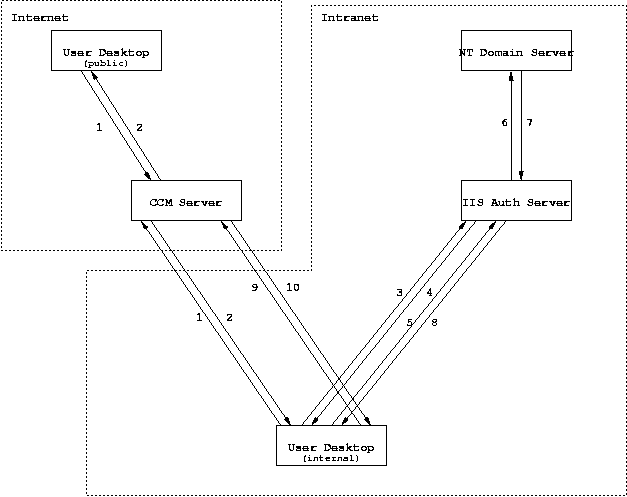
The architecture for the NTLM authentication system has been designed such that there is no need for direct communication between the public facing APLAWS servers and the Intranet Domain Authentication Server. The means that integrity of the firewall is not impacted. To make this possible, authentication actually takes place on a third internal server running a mini Java Servlet. This communicates with APLAWS via browser redirects & encrypted URL parameters.
Since visitors from outside the Intranet do not authenticate against the Domain Authentication Server, there is the ability to specify your local network address range and fallback on standard email/password authentication for all other visitors.
The complete process for authentication proceeds:
Prior to starting off with these instructions, the following requirements must be met:
To ease the installation process, it is wise to install the following support software:
When downloading these programs be sure to run them through a Virus checker before launching the installer. Likewise for any files downloaded throughout this document.
The first step is to install the dedicated authentication server and get it communicating with the Domain Server.
Running the Resin Servlet Engine requires that the full Java SDK be installed. The JRE alone is not sufficient because compiling JSP pages uses the compiler in the SDK. Download the latest 1.3.1 release of the J2SE SDK from Sun's Java site. This is approximately a 30 MB download.
The download is a self-extracting installer, so just launch the
program when the file has finished downloading. When it askes
you which directory you want to install in, be sure to change the
default of c:\jdk1.3.1_08 to c:\java131.
This is because a number of windows programs, including the command
shell, have trouble with directories containing more than one '.'.
To run the APLAWS Authentication Servlet we need a Java Servlet Container. Resin is by far the simplest to install & one of the fastest in operation (not that it matters for an authentication server). Download the latest 2.1.x release (currently 2.1.9) from www.caucho.com. NB For a production system you'll need to purchase a license from Caucho for a small one-time fee.
The download is a ZIP file, so extract it using WinZIP (or equivalent)
into a directory such as c:\. NB. the
files automatically extract into a subdirectory of the one you
specify, called resin-2.1.x.
Once you've extracted Resin, go into the bin directory
and run httpd.sh. NB At this time
don't run the setup.exe program. After a short delay
you should see a message in the console window saying that the
server is listening on port 8080 and that 8 (or so) demos have
been initialized. Point your web browser at port localhost:8080
and verify that you can see the demos.
Apart from (obviously) installing the beast, the main task is
to turn on authentication. IIS currently supports 5 types of
authentication; the one we want is currently referred to
as Integrated Windows Authentication.
Start Menu select Programes -> Administrative Tools -> Internet Services Manager
'Default WebSite' node.
Properties....
Directory Security tab. Under Anonymous Access and Authentication
Control, click Edit.Authentication Methods dialog box, unselect
Anonymous Access and select Integrated
Windows Authentication instead.
When clicking Apply it may pop up a dialog
mentioning that some lower tree nodes override the security settings.
Select all these nodes and apply the changes to them too.
We now need to integrate Resin with IIS, so go into the Resin
bin directory and run setup.exe. If
its not already selected, select the IIS/PWS box
and then hit apply. This should install the Resin
connector in IIS. To verify this, try accessing the Resin demos.
To test that it has worked correctly, load Internet Explorer and
browse to http://localhost/examples/index.xtp.
Click on the Servlet Parameters exmaple
and look at the Remote User field - it should
display your NT Domain Login.
Once you've verified that everything is operating correctly we need to automate startup of resin at server boot. So shutdown resin and launch a command shell and run.
cd c:\resin-2.1.9\bin
httpd -install -Xrs
NB the -Xrs option is very important as it tells the JVM not to exit when the administrator logs out! Now to verify that everything is operating correctly shutdown the server and boot from the powered off state.
We're now ready to install the APLAWS authentication servlet.
The first step is to install & register the Bouncy Castle
cryptographic libraries with the JDK. Copy bcprov-jdk13-115.jar
and jce-jdk13-115.jar to c:\java131\jre\lib\ext.
Now edit the java.security file in c:\java131\jre\lib\security
adding in the line:
security.provider.3=org.bouncycastle.jce.provider.BouncyCastleProvider
In the Resin webapp root, create a directory called
WEB-INF/classes/com/arsdigita/auth/ntlm and copy the
file NTLMUserAuthServlet.class into it. To register this
as a servlet under /auth we copy the web.xml
file to WEB-INF.
The final step is to create the RSA public/private keypair. This is
done using the command line keytool program that comes
with java. So launch the command shell and type:
set JAVA_HOME=c:\java131
cd c:\resin-2.1.9\webapps\WEB-INF
c:\java131\bin\keytool -keystore keystore -genkey -keyalg rsa \
      -validity 36500 -keypass 123456 -alias ccmkey
This generates a key that is valid for 100 years, which ought to
be sufficient for most users. When prompted for a password be
sure to enter '123456'.
It will prompt you to enter your name & organization details when generating the key - enter anything relevant - it has no functional effect.
The first step is to install & register the Bouncy Castle
cryptographic libraries with the JDK. Copy bcprov-jdk13-115.jar
and jce-jdk13-115.jar to /opt/IBMJava2-131/jre/lib/ext.
Now edit the java.security file in /opt/IBMJava2-131/jre/lib/security
adding in the line:
security.provider.3=org.bouncycastle.jce.provider.BouncyCastleProvider
On the IIS server, we need to export the public part of the
keypair. This is accomplished using the keytool
command again:
cd c:\resin-2.1.9\webapps\WEB-INF
c:\java131\bin\keytool -keystore keystore -export -alias ccmkey -file c:\temp\ccm-public.key
Securely copy this across to the APLAWS application server
using WinSCP (or equivalent). Go into the APLAWS
webapp WEB-INF directory, which is usually
/var/www/aplaws/dist/WEB-INF and import the
key:
cd /var/www/aplaws/dist/WEB-INF
/opt/IBMJava2-131/bin/keytool -import -keystore keystore -alias ccmkey -file /tmp/ccm-public.key
Again, when prompted for the keystore password, enter '123456'.
The final step is to enable the NTLM authentication process for users visiting from your Intranet. For this we need to know the IP address range allocated to Intranet users. This is typically one of the RFC 1597 private address spaces.
/etc/aplaws.cfg
and for the auth-internal-ip-range option specify
your IP range in the form 172.16.0.0/255.255.0.0.
admin-id enter the Windows username of the
person who will manage the APLAWS Site admin account
auth-server option should be the
hostname (and possibly port number) of the IIS authentication
server
If it doesn't work as expected you can set log4j logging on the
category com.arsdigita.auth.ntlm to
debug.